Showing posts with label hanging. Show all posts

Tuesday, January 21, 2014

Pros & Cons of Hanging Storage Racks

Saferacks, Hyloft, Strong Racks, & Topp Rax


This article will save you time looking for overhead storage shelving with this pros and cons of various brands. For me the storage & organization department of the hardware store always gets a peek. I get pumped up about shelving … strange, I realize. I enjoy taking time studying the materials, evaluating the anchors and brackets, and appreciating the creative models. Your enthusiasm probably lays with something else, so allow me to expedite your researching efforts by summarizing my findings for you.

I have tried to mention something good and bad about each manufacturer. However, I am disclosing at this point that I sell the Topp Rax brand through my ecommerce site, so my opinions are unavoidably partial plus I have the most knowledge about this brand. I would be glad to sell any of these brands on my website if I were able. It's in my best interest to supply many options to my site's visitors, to allow them to purchase the rack that has the features that are most important to them. Disclaimer aside, let's evaluate a number of the major brands.


Saferacks has many inspiring images on their site and they also have accessories to go onto their racks. Overall, this is an excellent buy and it’s easy to get one at a terrific price because they can be bought at CostCo. Saferacks are also sold under the MonsterRAX brand. The company sells an excellent assortment of sizes between 4/6/8 feet wide and 2/3/4 feet deep. These choices are great because not everyone needs a 4x8 rack. I praise their use of C-channel framing and cross tie supports. My only issue is that certain cross ties are smaller since they're meant to support only the decking. Which means the design has a weak point on the outside frame. What's more, I find it funny their site uses pictures of families hanging from the rack to show how safe their product is even though the instructions very clearly state “Do not climb on or hang from the storage rack.”


Hyloft is designed with a minimal design that make the shelf less costly. The drawback is that it isn't as sturdy as different brands. The cross tie supports and vertical brackets are minimal. I would find it difficult trusting this rack not to fall once it is loaded with my belongings. However, if I were storing merely light-weight items, this would work well. Note that the lack of ceiling brackets that span multiple ceiling beam may limit your options for orientation and location. I admire how inexpensive their 4x4 rack is and would consider that for small storage needs which are not above a regularly trafficked path.


Strong Racks is built with the reverse approach. This shelf is almost overbuilt. The Strong Racks website has a nice ‘Checklist Challenge’ video that covers the details. For example, the mounting tracks are 11 gauge steel where 14 gauge is typical in other products. The verticals are square tube steel as opposed to regular angled steel. Their product utilizes more nuts and bolts as compared to any other rack. Expect to spend a lot of the installation time tightening these fasteners. I appreciate the ridge along the edge of their framing. It keeps you from unintentionally pushing stuff over the back of the shelf. This also relieves worry about my boxes sliding over the side.


Topp Rax displays their solid design in a ‘Compare Racks’ video that features a stomp test on various brands. You can see how solid this rack is when the guy in the video shakes the side of each rack. I enjoy watching the competitor's racks bend when he walks and bounces on the outside frames. Yet the Topp Rax framing stands up because of the additional cross ties that reinforce the frame. The decking is correctly supported on all four sides by the framing, too. The problem with Topp Rax is that it isn't a low cost product. If you live near a big box hardware store, you can find sufficiently sturdy racks at a better price. One more bad thing is that online it is only available in 4x8 size.

Learn how to declutter your garage using my personal step-by-step approach and shop for garage storage solutions at www.MaximizeGarageStorage.com.


Friday, January 17, 2014

6 Overhead Storage Ideas (with Pictures)

This article is a quick overview of different ceiling storage options. Consider the advantages and disadvantages and decide what is the preferred fit for your garage organization venture. No matter the alternative you select, consider weight limits of the overhead storage options and be safe.

http://contractorkurt.com/2012/02/18/overhead-garage-mightyshelves/

You could build a hanging rack from lumber. This alternatives requires the correct tools for cutting wood, in addition to a little handyman skill. For anybody who is comfortable cutting, measuring, and anchoring this method may be good for you. Many sites supply free blueprints for hanging shelving, which means you don’t have to be a professional carpenter. Yet a negative thing is that the decking will likely be a piece of wood. This can be less desirable than wire decking due to the fact you can’t see through this kind of decking to identify what you’ve stacked in the deeper parts of your platform.
http://www.maximizegaragestorage.com/products/heavy-duty-overhead-storage-rack-4x8


The next approach is to build a metal hanging storage rack. If you have the professional equipment and access to angled iron, you may be able to build one on your own. However I suspect you will not save much money. In the event you create your own solution, do not forget to factor in the cost of decking. If you opt to just purchase a hanging rack, you've got many companies to choose from including Topp Rax, Onrax, SafeRacks, Strong Racks, and Hyloft. This is nothing close to a complete list of companies. Please read my other article submissions because I plan to do a review of these brands.

http://www.familyhandyman.com/garage/storage/create-a-sliding-storage-system-on-the-garage-ceiling/step-by-step


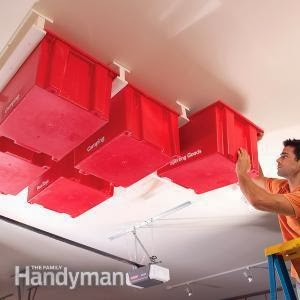
I see an image floating around on social networking sites (Pinterest) of 2x4’s attached to a garage ceiling with red bins that slide to the T-shaped structure. As impressive as this particular setup looks, the specific totes with reinforced lips along the top are expensive. For a half dozen bins, you could as well purchase a rack and pay someone to install it in your garage. You need totes with at least 3/4" overhang. Be mindful of the limits on rim height as well, which depends on how you build the tracks. Moreover, the containers are not transparent. I am a nitpicker for making use of clear totes for extended storage due to the fact it's so easy to forget everything you placed in each tote. Labeling might be sufficient so long as you label a minimum of two sides of the tote and do not store anything in the tote that doesn't fall under that label. Or just make it simple and use clear totes.

http://www.monkeybarstorage.com/shelf-rack-kit


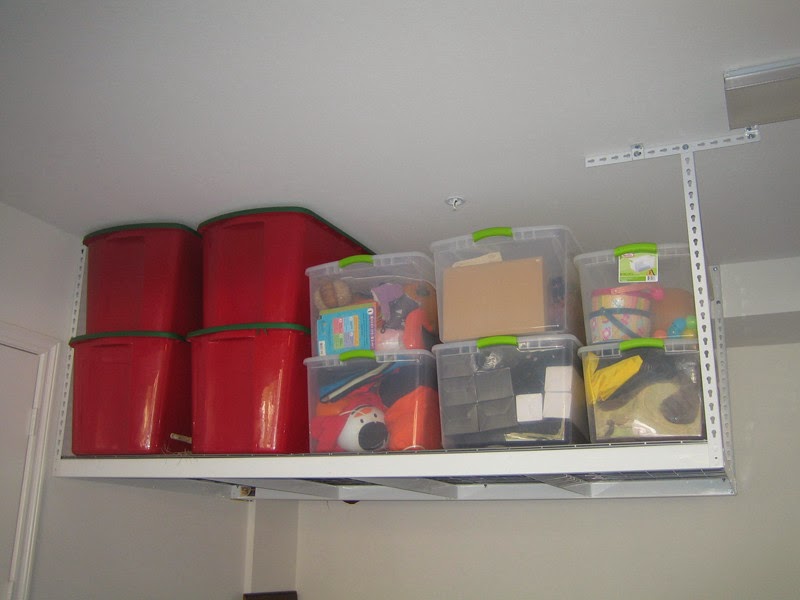
Another way to turn unused ceiling space into storage space is setting up a two-foot shelf along the edge of the garage. Again, there is an option to buy or build. Narrow shelving is enough depth to hold a row of totes. This kind of shelf doesn't entice you to bury your totes double deep, but I do not like the unused area in center ceiling. One particularly innovative product you can buy online is the Monkey Bar storage shelf. They've got numerous variations made by using standard parts in different combinations. Their product can be ordered as a tool rack, ski rack, golf rack, shelf kit, etc. I particularly am fond of easily moveable hooks as it allows me to shuffle around how I initially intended to be my best arrangement of hooks, but then discovered there was on a slightly better way of arranging the hooks. This kind of mixing is difficult if I make use of numerous individual nails and hooks.

http://maximizegaragestorage.com/products/ceiling-storage-lift


My last suggestion for overhead storage is a motorized lift. Smaller devices like the Racor ceiling storage lift has lower weight restrictions of 250 lbs. Garage Gator has a flexible arrangement of motor-driven hooks and cables. To get powerful lifts, consider the Loft-It storage lift. This beast provides a 1200 pound capacity which means you can place a watercraft, motorcycle, or lawn tractor on it. It is costly, but less expensive than building an additional garage!

http://www.loft-it.com/


Tuesday, January 14, 2014

Frustrated by Breaking Lag Screws?

Driving 3” lag screws used to mount hanging garage storage racks is a source of aggravation for many of us. They frequently have problems with them breaking. Here I will offer methods for ways to avoid this challenge.

The advice in this article is applicable to any kind of installation of longer lag screws, although my wisdom originates from installing ceiling brackets for hanging garage storage shelves. These types of shelves require two inch insertion into the wood. These racks include three inch screws since they have to pass thru drywall and thickness of the piece of steel.

Pre-drill
The most important thing to do in avoiding breaking lag screws would be to predrill the holes. Make use of a 3/16” bit and bore to the full depth of the lag screw. If you drill too shallow you will encounter significant resistance while driving the screw. I’ve heard some people have luck drilling another hole inside the first with a 15/16” bit, however only go as far as the smooth part of the lag screw. Keep in mind that wood is a natural product, therefore there is a probability you will encounter a knot inside the wood. These areas usually do not take a screw nicely plus they may lead you to reposition your mounting point.

Impact Driver
Next work with an impact driver to install the screws. The undertaking is time consuming using a socket wrench. Even a rechargeable drill with the adapter for sockets can carry out the job. Though by far most effective option is to use an impact driver. I have found that I have to employ two hands and position myself directly behind the tool in order to drive them successfully with a rechargeable drill. However when I take advantage of an impact driver, I'm able to turn the screws with just one hand and I don't have to align my body behind the screw. This is especially useful when I am using a ladder and may have to reach to my anchor.

Over Tightening
Another common problem is that people crank down on the lag screws. Do not over tighten the screws. Should you put excessive force on the head when the top of the lag screw is flat against the drywall, you chance twisting off the head while having the threads embedded inside the stud. This may cause issues with connecting your ceiling bracket since you could be attaching across the ceiling beams, which means you won’t have the option to simply slide the bracket down a bit to create a fresh hole. Turn the anchoring screws only till the head contacts the bracket. They don’t have to be "tightened down" any further.

Putting soap or wax to the threads may make it easier to drive the screw. I recommend using candle wax when possible, because over time the soap will cause the threads to rust.

Grade 5 Lag Screws
Should you be dealing with poor quality screws, think about making a trip to the hardware store for higher quality hardware. The grade and material of lag screws are marked on the head. No markings signifies a low grade 2 and has the least tensile strength. Three radial lines indicates grade 5, a medium carbon steel that is quenched and tempered. These should install successfully and not have regular breaks. The final and best ranking of steel screws have got six radial marks and are grade 8.

Stainless lag screws would not have these standard markings on them, though they have the approximate tensile strength as grade 5, nonetheless they may bend easier - more on bending later. Stainless will likely have something printed on the top of the head, therefore you won’t mistake them for grade 2. Stainless also is non-magnetic.

Re-using Hardware
I don't advise re-using lag screws. Once used, even if not to its full depth, the lag screw is stressed. The chances are greater it would break if you attempt to use it again. Which also means you shouldn't install a lag screw by running in and out of the stud to drive it to length. Finally, a tiny amount of bend in the screw will keep the lag screw from turning and boring down into the wood properly.

Learn more about how to organize your garage with ceiling storage racks and other great storage products at www.MaximizeGarageStorage.com.

Thursday, January 2, 2014

Planning and Measuring for Ceiling Storage Rack in Your Garage

You would like additional space for storage in the garage, so you've made a decision to install an overhead storage rack. The next thing is to plan and measure your available space to determine where you can install the shelving and what sized rack is suitable for your garage. This plan will save you from buying a rack that will not fit and it may highlight other areas you could potentially add overhead shelves.

Round up tools to create your plan. Get a paper and pen to write down dimensions and draw various configurations you are considering. Use a stable step ladder and good tape measure. Measuring tapes measure how long you are able to stretch it by a characteristic named standout. It will be helpful to have a measuring tape with at least 8 foot standout; otherwise, get assistance from a friend to measure longer distances. Finally, you will need a stud finder to check the direction of the ceiling beams.

Some manufacturers mandate installation perpendicular to ceiling beams, which will restrict your choices of where you could do the installation in your garage. Numerous shelves consist of ceiling hangers longer than 24" that install flat on the ceiling in whichever course is required to cross multiple beams, plus a vertical support bracket is bolted into the ceiling bracket on either side is needed to get the preferred alignment of the rack.

In general, your installation choices are in the corner, down a wall, or floating in the center of the ceiling space. Corner installs is going to be the simplest. Corners are often an excellent out of the way location for storage anyhow. Down a wall offers other choices for locating your shelving. You can also chain together several racks to span the full length of the wall. Center installation opens more of the ceiling as potential space for storage. You will get easy accessibility to either side of a rack when it is installed center-ceiling. Because a 4 foot deep shelf can easily be stacked double-deep with items it’s nice to have the ability to get to either side.

Ponder these less apparent places for rack installation. In case you have adequate space above the garage door when it is in the up position, you should be able to secure the shelving there. Look at the rack manufacturer’s installation guidelines to find the minimum vertical space required for this location. The wall over the access door is a good location, too. For those who have typical eight foot ceilings and are uncertain where to install the rack shelf, find an infrequently traversed corner. Floor items including the lawn mower, snow thrower, saw horses, etc. can be stored on the floor below a corner shelf and you still can use the area above these floor items for storage. The space over the hood of the vehicle is another often unused storage area. Install the rack high enough so that you are satisfied with the clearance. Keep in mind all auto parts protruding from your hood, like the antenna or aftermarket accessories.

Be cautious about generally ignored obstructions such as windows and lights. In case your rack would be along the wall, consider trim on doors and windows. Always keep walking spaces unobstructed and have sufficient headspace. Identify smaller obstructions such as electrical conduit installed on the face of the wall or electrical outlets you do not desire to cover. Sketch out the dimension of your shelf onto the ceiling to make sure it does not extend into the garage door opener.

I hope these tips will help you plan a successful hanging shelf installation, and the additional storage space created by it will help you to make more room in your garage. Find overhead garage storage solutions at www.MaximizeGarageStorage.com, where I share my step-by-step approach to organizing a garage. That's why I am Your Garage Elf.

Wednesday, December 18, 2013

4 Required Tools to Install Overhead Rack

Even though other tools may get the job done, work with the best tool to save time and finish the job faster. Making use of the wrong tool might cause injuries. It can cause fatigue from doing work harder than you'll want to, which leads to aggravation or annoyance with the task. Take the easier route by using the right tools. In the event you do not already own them or perhaps it does not seem sensible to purchase them, ask friends or nearby neighbors whether they have the instruments you require and borrow the tools.

Impact Driver 

Hanging shelves must be installed securely to ceiling supports. Run those lengthy three inch lag screws in to the joists with an impact driver. It is best to drill pilot holes to ensure you do not chance splitting the wood which would weaken the beam. A rechargeable drill will drive lag bolts, perhaps with a bit of help from candle wax on the threads, however it is significantly less taxing to work with an impact driver. You should have an adapter for the impact driver to be able to connect sockets from your socket kit.

Deep Scan Stud Finder

A stud finder with double layer scan mode is necessary for locating studs inside your ceiling. This is because the ceiling may have extra sheets of drywall, popcorn texture, or insulation that disrupts the standard stud scan. I do not suggest you use hole punches, coat hangers, and long thin nails in an exhaustive effort to locate the center of the beams. Most mid quality stud finders have a deep scan function. Look at the instructions that come with it for how to enter deep scan setting. You can choose the style with digital display which will make clear the location of the edges of the joists are, and the best kinds include a light and/or tone to point out the center of stud.

Wide Tape Measure

A wide tape measure can be stretched to longer lengths without folding. Find a tape measure wider than 1” wide. Even though it’s probably the most convenient tape, the adorable little tool in pretty pink household tool kit isn’t going to work well for this project. Quality tape measures put special markings on 16” increments for wall studs, which may apply in the event your ceiling beams are also space 16" on center. The foot intervals should be highlighted on any tape measure.

Rubber Mallet

You should not be tempted to use a claw hammer where the instructions advise a rubber mallet. You will end up denting, mangling, or scratching the metal rack. First you will say to yourself you can be gentle. Then you’ll be angry at yourself for not bothering to pick up the mallet. You will also protect your hearing from the sounds of metal banging on metal. For those who insist on using a hammer, place a wooden block on top of where you are hammering. This method could benefit from growing another arm (or locating an assistant) so you can hold the part, position the wooden block, and swing the hammer simultaneously.

Conclusion

With the proper tools, your ceiling garage storage rack installation should be an pleasant and satisfying job. Purchase or borrow that which you do not already own. Acquire an impact driver, wide tape measure, stud finder with deep scan, and rubber mallet. This isn’t a complete listing of the tools you’ll have to install an ceiling rack, however they could make the job much easier and take less time.

If you're looking for a sturdy overhead rack (rated for 1,000 lbs) to install in your garage, consider a Topp Rax super duty 4x8 overhead rack from www.MaximizeGarageStorage.com

Monday, December 16, 2013

What to Look for In Ceiling Mounted Shelf


Your garage is a place to park your car. It may have a space for your workbench. It likely has some organized storage… and then there’s the clutter. The clutter in your garage could be depriving you of the usefulness and your enjoyment of your garage.

Redefine this useful space with shelving, cabinets, racks, and also other storage products. Turn bare walls into a zen-like space of order and serenity (or at least get rid of the stress and trouble the mess causes). If your next challenge will be to organize your garage, make use of this advice to assist you to reclaim your garage.

Well-organized garages across the country - especially homes without basements - have discovered they can mount a shelf on the ceiling. Rather than rummaging through stacks of boxes, organize them with an especially convenient ceiling rack.

Overhead garage storage shelving help you organize your garage. Take back floor space by mounting one of these unique storage solutions to the ceiling. It will assist you to conquer that clutter. Fill your wall space with shelving to keep used often items handy. Use the ceiling option to store seasonal and seldom used things in your garage.Things to consider in a Good Rack

A versatile design enables the rack to be installed with or across ceiling joists. Ceiling mounts should cover more than one ceiling joists. Length and width of 4’ x 8’ and 4’ x 4’ are common. It is normal since it spans across 12”, 16”, or 24” joists evenly.

Some companies sell racks in incrementally smaller sizes, too. Be sure to mount them securely to ceiling joists. You can even chain together several racks together with each other to maximize storage area. Drop height (vertical installation measurement) range between 18” to 46”.

Feel safe by using a rack built with heavy duty industrial strength construction. Many offer 14 gauge powder coated steel frame. Colors are generally white or metal gray. Solid decking will keep the shelf from sagging, bending, or breaking with time. The framing could be Z-channel, L-channel, or C-channel… but the best is C-channel framing.

All installation hardware should be included, to ensure you don’t need to search the home improvement store for anchors that can fit through the pre-cut holes on the mounting brackets plus are of sufficient length to go into your ceiling joists.

Weight ratings on ceiling shelving range from 250 lbs up to 1,000 lbs. The set up instructions for most racks say the load should be evenly distributed. That’s how most free-standing shelves get away with advertising their shelving get a “2000 lb” limit… although none of the ¼ particle boards on a 4-tier shelf holds 500 lbs.

Prior to making your final decision to purchase, read reviews and check customer feedback to check if the product meets the promises on the box (or website). Be sure exclusive framing and decking types haven’t compromised the sturdiness of the rack, and also that existing customers are confident and happy with the durability of the shelf.


For details on Topp Rax's 4x8 super duty overhead storage rack and to buy online visit www.MaximizeGarageStorage.com.